Run retail operations with one connected system.
UltimatePOS is built for real shops that need the website, the till, the stock file, supplier ordering, reporting, and content management to work together instead of fighting each other. This manual is written as an operational reference, not marketing copy, so every section focuses on what to do, what to configure, and what to check next.
dist/.api/ with installer-based first-run setup.database/schema-base.sql.Quick Start
This is the shortest practical route from fresh deployment to a working store. Use it for first-time setup, demo environments, or refresher training before a new launch.
Launch Checklist in 8 Moves
- Run the installer and create the first admin account.
- Complete General Settings and store details.
- Configure payments and delivery rules.
- Create categories, then products, then variants.
- Create at least one cashier for POS use.
- Run one web checkout test.
- Run one POS sale including start-of-day and end-of-day.
- Review reports and confirm everything reconciles.
What to test before going live
- A product appears correctly in the storefront.
- A barcode finds the correct item in POS.
- Payment methods show correctly in the right channel.
- Loyalty settings behave as expected.
- Supplier ordering workflow can be completed.
- Cash count and end-of-day reporting match the till.
- Staff know which role guide they should follow.
Requirements
Before installing UltimatePOS, confirm the hosting environment is ready for both the PHP backend and the built frontend bundle.
Server Requirements
- PHP 8.1 or newer.
- MySQL 8.0+ or compatible MariaDB with JSON and
utf8mb4support. - Apache or Nginx with PHP-FPM.
- HTTPS-enabled domain or subdomain.
- Write permission to the project root during setup so the installer can create
.env.
Deployment Package
dist/and its compiled assets.api/includinginstaller.phpand all endpoints.database/schema-base.sql.- Static assets such as
robots.txt,manifest.json, andservice-worker.js.
dist/index.html. Do not serve the source project index.html in a live environment.
Installation
Use the installer for fresh deployments. The installer validates database access, imports the base schema when needed, seeds initial settings, and creates the first admin account.
Step 1: Prepare the server
- Create an empty database for the application.
- Create a temporary installer or migration database user with schema privileges for that database.
- Create a separate runtime database user with data-only privileges for normal operation.
- Upload the project files to the intended web root or deployment directory.
- Copy the built frontend from
dist/so the compiled application files are publicly served. - Confirm PHP can read project files and write a root-level
.envfile. - If an old
.envexists from a previous installation, remove it before first run.
Step 2: Run the installer
- Open the site URL in a browser. A fresh installation redirects to
/setup. - Enter the application URL, database host, port, database name, and the temporary installer user credentials.
- Enter the store identity details such as store name, phone, email, and address.
- Create the first administrator account with a strong password.
- Submit the installer and wait for schema import and initial seeding to complete.
- After setup, replace the database credentials in
.envwith the restricted runtime user.
Step 3: Validate the installation
- Login works at
/login. - Admin pages load without setup redirects.
- A test product can be created and saved.
- Store settings and payment settings can be opened.
- POS loads for staff or admin users.
database/schema-base.sql automatically when the required tables do not yet exist.
SELECT, INSERT, UPDATE, and DELETE on the application database. If an upgrade needs one-time schema backfills, temporarily switch to the installer account, apply the schema, then switch back.
First Login and Initial Setup Order
After installation, the fastest way to get the system operational is to configure the basics in a sensible order rather than jumping between modules.
- Login as the admin user created during installation.
- Open General Settings and enter store identity, contact details, tax rate, order prefix, loyalty settings, POS float, age verification, and printer settings.
- Open Payments and configure Viva Wallet, PayPal, and Viva POS terminal credentials if you plan to use them.
- Open Delivery and create active delivery or collection options.
- Create product categories before creating products.
- Add products, variants, prices, stock, images, and barcodes.
- Create POS staff accounts if non-admin staff will use the till.
- Run a test sale in POS and a test web checkout before going live.
Role Guides
UltimatePOS is easier to train and operate when responsibilities are split clearly. These role guides explain which parts of the system each person should care about most and what their normal routine should look like.
Store Owner
Focus on commercial control: store setup, pricing rules, payment providers, supplier relationships, margins, reporting, and go-live quality.
- Owns business settings and payment decisions.
- Reviews reporting, margins, and supplier performance.
- Approves live process changes.
Administrator
Focus on system accuracy: products, categories, customers, orders, deliveries, content, and troubleshooting configuration issues.
- Maintains data quality.
- Supports staff and resolves operational issues.
- Controls what appears online and in POS.
Store Staff
Focus on execution: serving customers, handling POS sessions properly, following age-check policy, recording cash movements, and closing the till correctly.
- Uses POS and customer display.
- Runs start-of-day and end-of-day routines.
- Escalates exceptions to admin or owner.
Store Owner Guide
This is the high-value workflow for the business owner or decision-maker. It focuses on setup, commercial controls, operational checks, and the points where mistakes cost money.
- Complete General Settings first so the store identity, tax rate, order numbering, loyalty rules, and POS float are correct.
- Configure payment providers before launching. Test both the website checkout and the in-store payment path.
- Review delivery rules and collection logic so the customer promise is accurate before orders start coming in.
- Approve product structure, pricing standards, and stock-management rules before the catalog grows.
- Set expectations for staff cash handling: opening float, cash adjustments, refunds, and end-of-day reconciliation.
- Review reports routinely, especially total sales, cash variance, supplier ordering performance, and best-selling products.
- Use supplier records and supplier orders to keep stock availability aligned with actual demand instead of relying on memory.
- Before making major live changes, test them with one product, one order, or one till session instead of changing everything at once.
Administrator Guide
Administrators keep the system accurate. Your job is not just to enter data, but to keep the storefront, POS, and reporting aligned so staff can trust what they see.
- Review the dashboard, web orders, POS sales, and supplier activity at the start of each day.
- Maintain categories and products carefully. Create clean structures, use reliable SKUs, and keep barcodes and stock status current.
- Check customer requests and supplier orders so promised items are followed through and not forgotten.
- Keep media, storefront content, brands, and blog content up to date so the public site remains consistent with current stock and promotions.
- Use delivery, payment, and general settings pages to control behaviour centrally rather than solving issues ad hoc.
- Create and maintain cashier accounts instead of sharing the same login across the whole team.
- Use reports to investigate exceptions: missing stock, odd sales patterns, cash mismatch, or failed supplier follow-up.
- When troubleshooting, verify configuration first, then data, then browser cache, before assuming there is a code defect.
Store Staff Guide
Staff should use the system consistently rather than inventing workarounds. The POS is reliable when the till routine is followed properly every time.
- Login with your own cashier code at the start of the shift.
- Count the till accurately and enter denomination quantities, not value totals, when declaring the opening float.
- During sales, add the correct items, confirm variants carefully, and attach a customer when loyalty or customer history matters.
- Use discounts only within store policy and complete age verification correctly for restricted items.
- If cash is removed or added for any reason, record a cash adjustment immediately. Do not wait until later.
- If a customer pauses their purchase, park the sale rather than trying to remember it manually.
- If the internet connection drops, continue using POS normally and tell a supervisor if the offline queue warning remains for too long.
- At the end of the shift, complete the cash count carefully and do not close the till until the end-of-day process is finished.
Public Storefront
The storefront is the customer-facing website. It displays products, categories, offers, brand content, blog content, cart state, checkout, and account pages.
Homepage
The homepage can show featured categories, a hero section, product highlights, latest blog entries, and brand content depending on your storefront settings.
- Open the site homepage.
- Confirm hero text, imagery, and featured areas match your brand.
- Check featured categories and spotlight products display correctly.
- Verify brand logos, blog previews, and contact details are current.
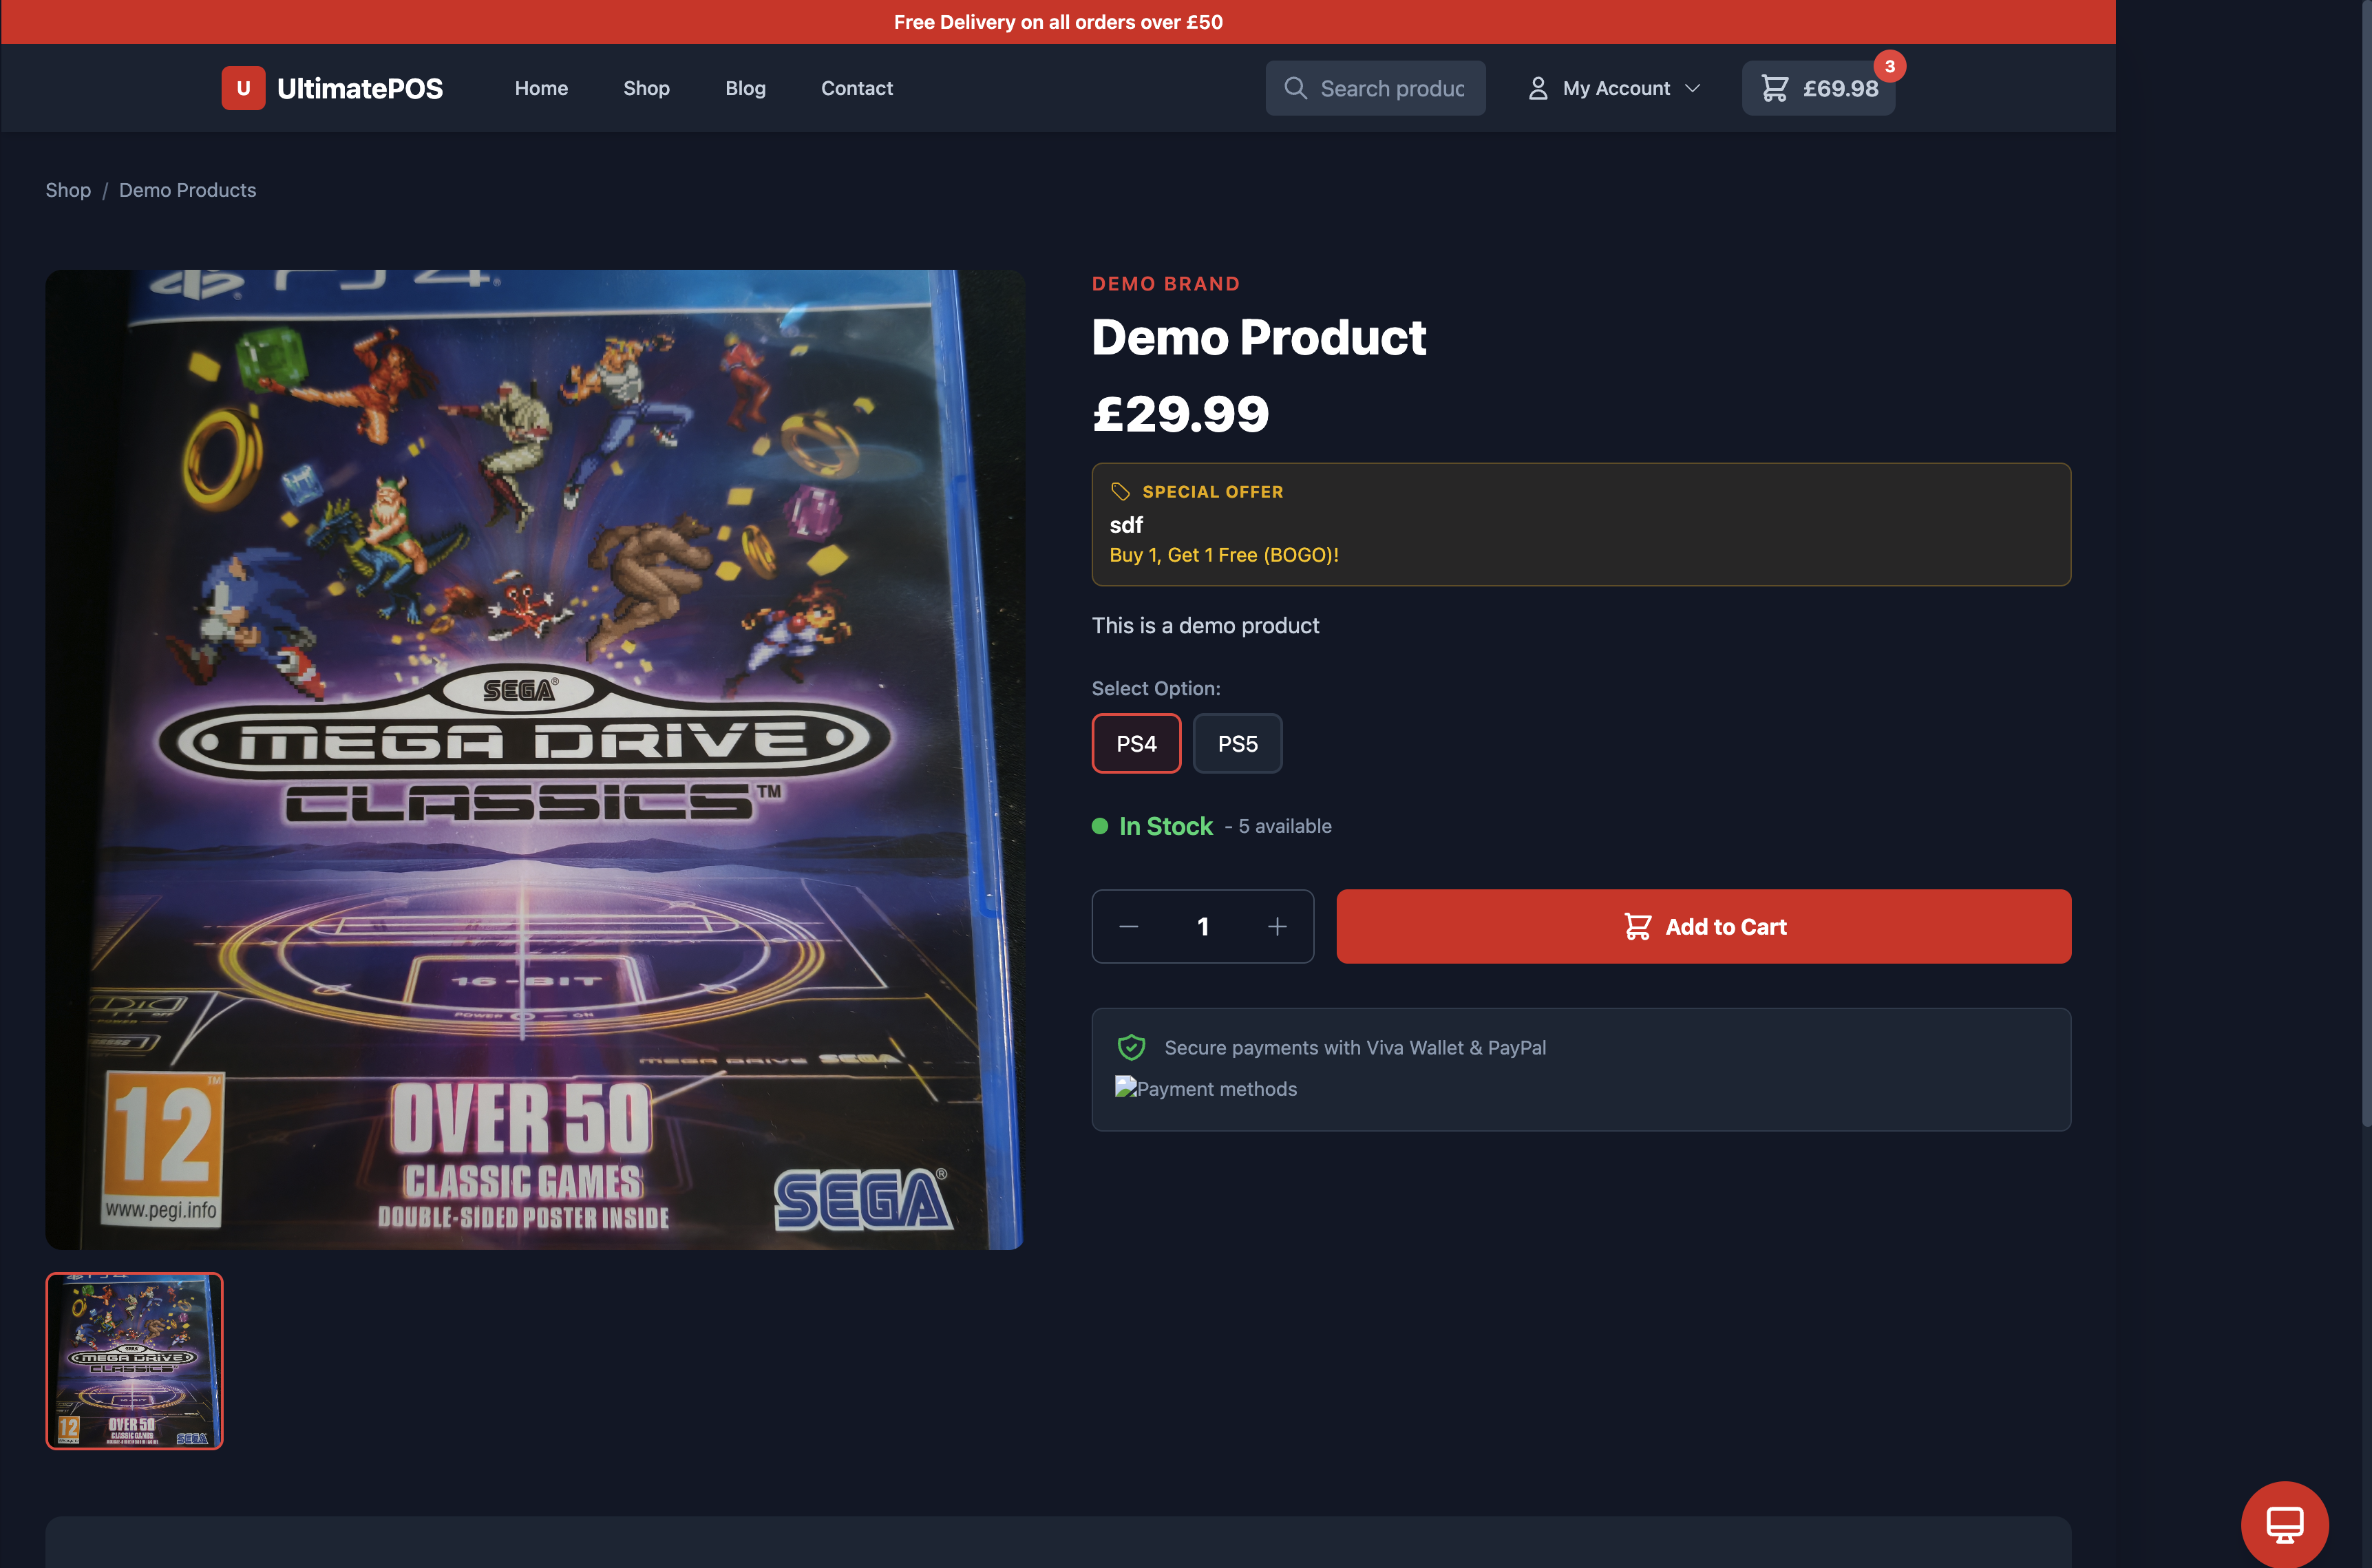
Shop and Product Pages
Customers browse products by category, filters, search, or direct product links.
- Open
/shopto browse the main catalog. - Use categories and search to narrow the product list.
- Open a product page to choose a variant, review details, and add it to the cart.
- Check product images, descriptions, pricing, and stock messaging before publishing products live.
Checkout and Order Flow
The checkout uses a structured multi-step flow so billing, shipping, delivery, loyalty, and payment can be completed in sequence.
Customer checkout steps
- Add products to the cart and open the cart page.
- Review quantities, remove unwanted items, and continue to checkout.
- Login or continue as a guest depending on the store policy.
- Enter billing details and shipping details.
- Select a delivery method. Collection-only products restrict delivery choices automatically.
- Apply loyalty redemption if available.
- Select an enabled payment method such as Viva Wallet or PayPal.
- Submit the order and verify the thank-you page loads.
Customer Accounts
Customer accounts hold order history, addresses, profile details, and loyalty point information.
- Customer logs in at
/login. - Customer opens
/accountto review previous orders. - Customer can open an order detail view to see items, totals, and addresses.
- Customer can update account details and address information.
- Loyalty balance is visible where applicable.
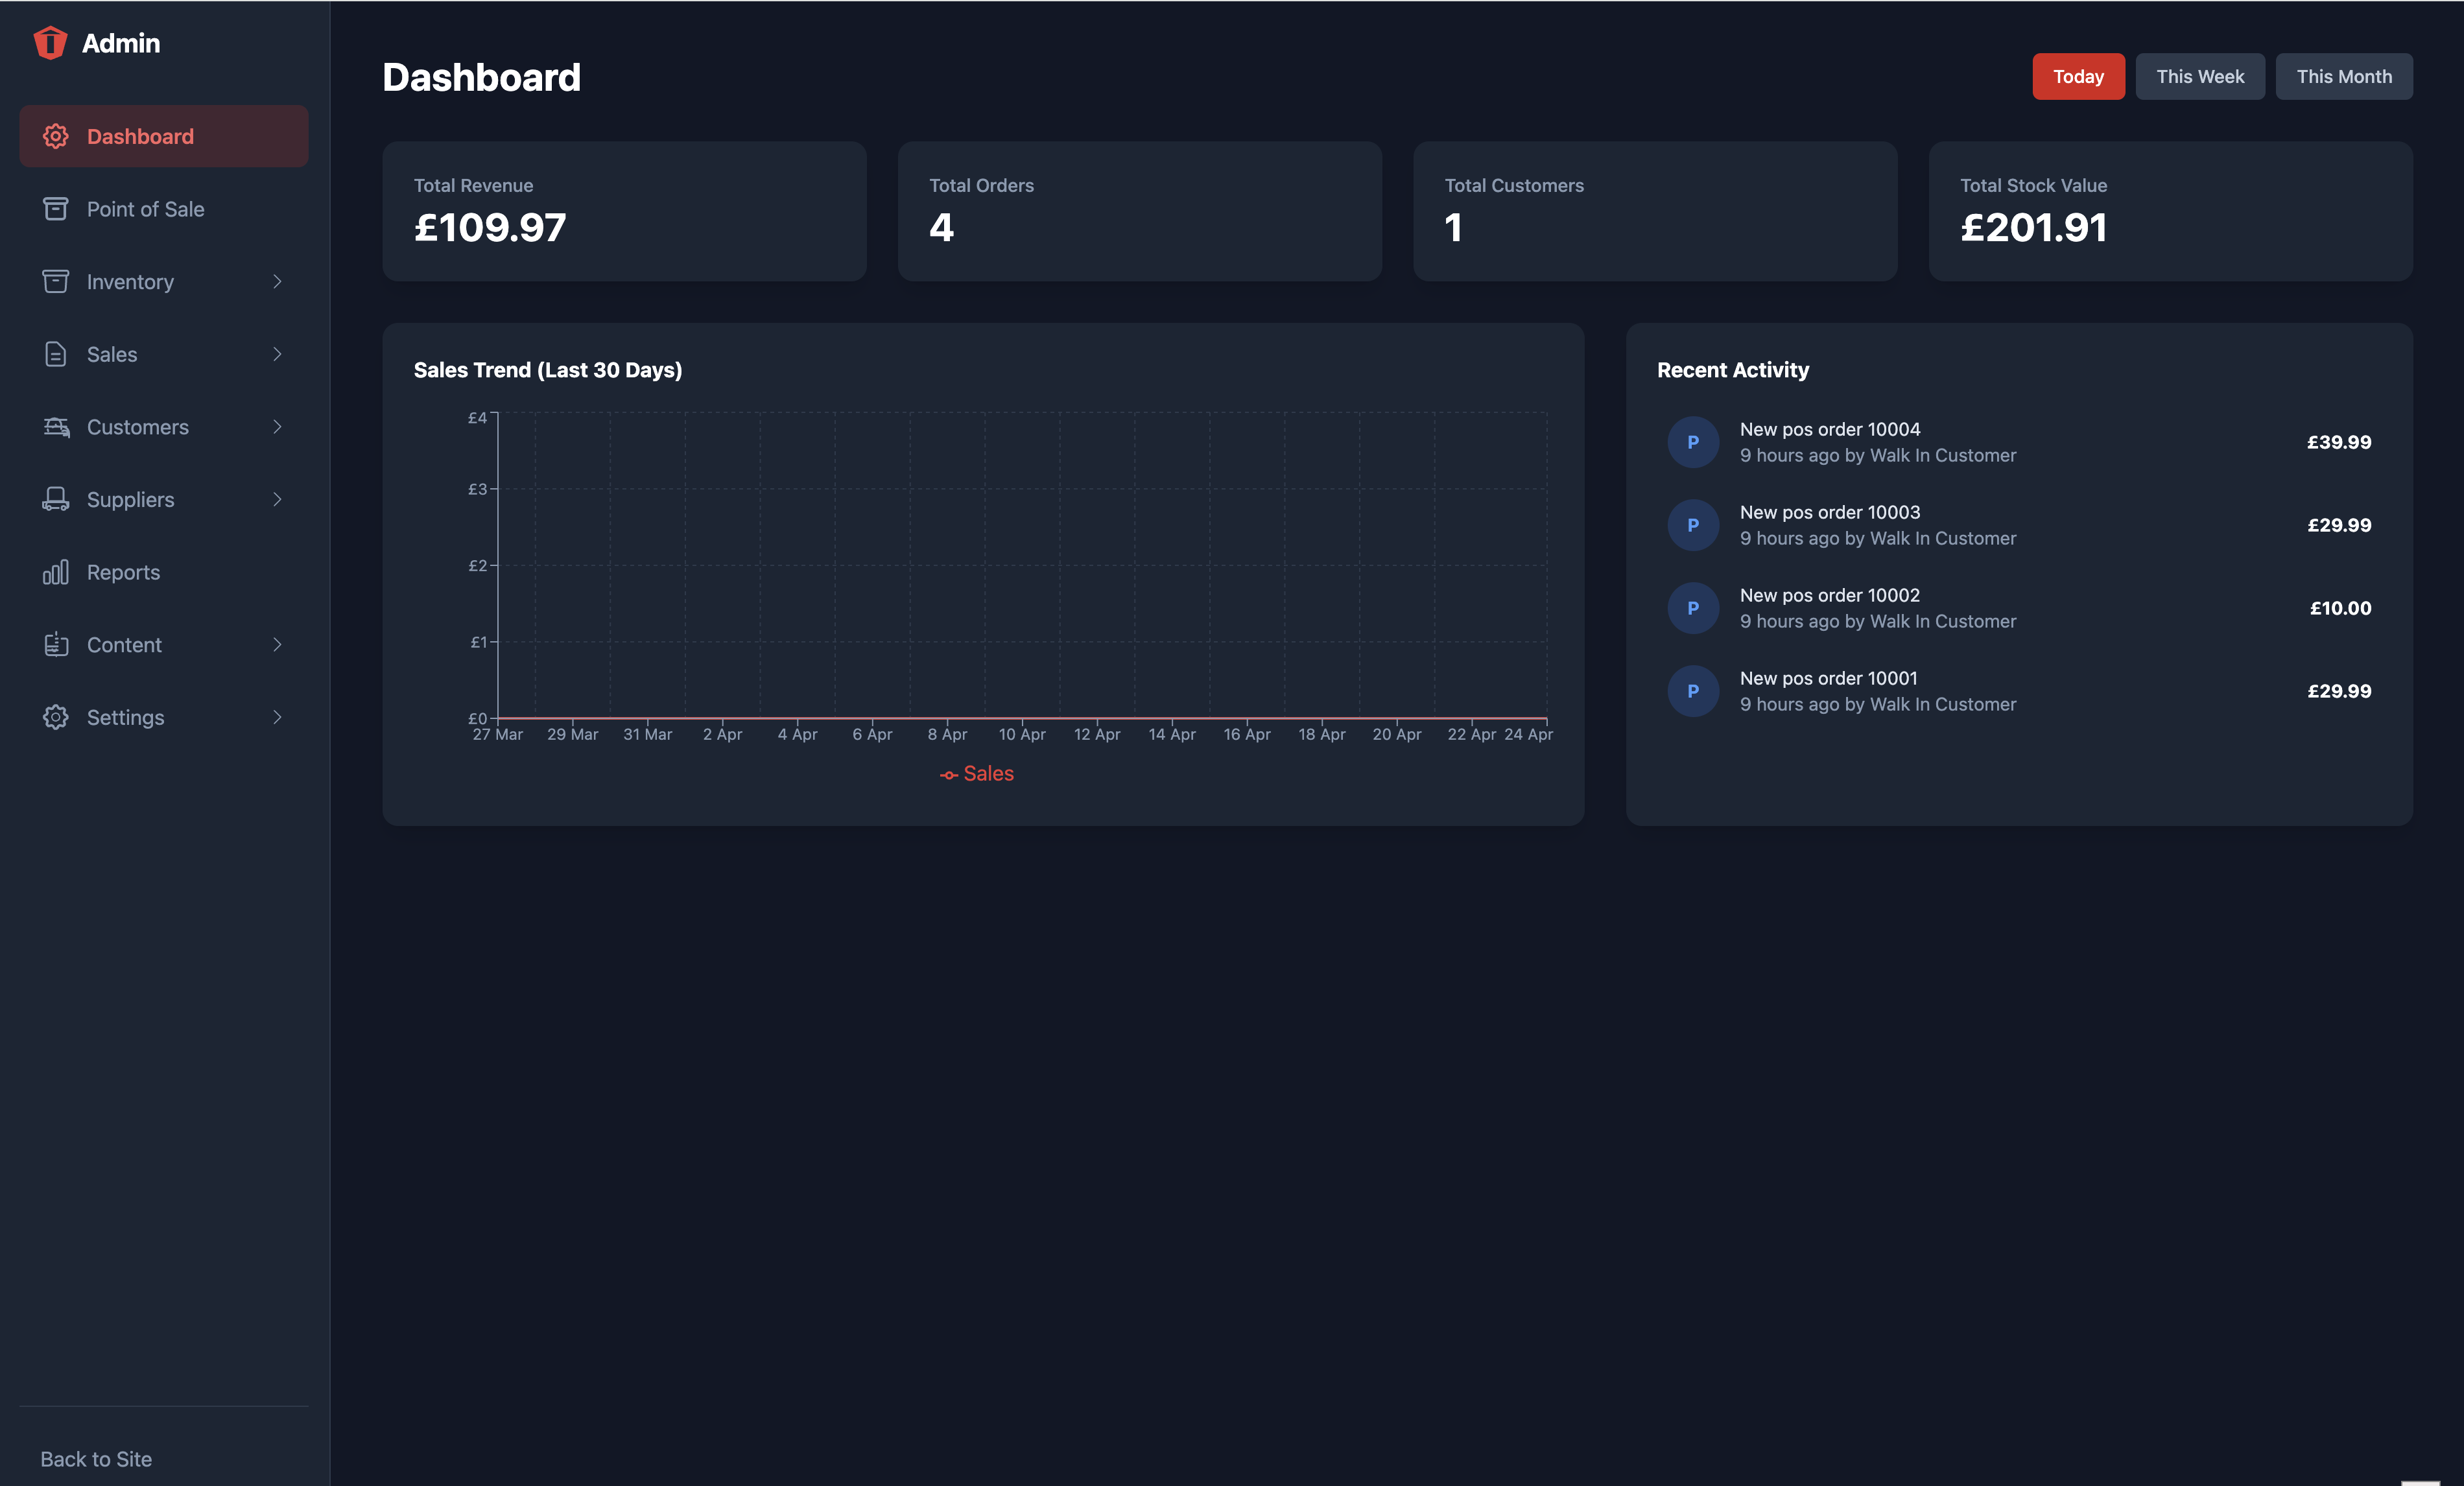
Admin Dashboard
The dashboard is the control centre for administrators. It gives quick visibility into business activity and provides the top-level path into each module.
What it is for
- Quick sales overview.
- Recent activity and operational visibility.
- Fast navigation into the main admin modules.
Recommended daily use
- Check new orders and unresolved operational issues first.
- Use the sidebar to move directly into POS, inventory, reports, or customers.
Products and Categories
Products, variants, categories, stock status, pricing, and barcodes are managed here. Set up categories first, then add products into the correct structure.
Create product categories
- Open Admin → Inventory → Product Categories.
- Create top-level categories first.
- Add child categories if your catalog needs nested structure.
- Set category order to control storefront and admin listing order.
- Mark age-restricted categories where required.
Create a product
- Open Admin → Inventory → Products.
- Create a new product and enter the product name, brand, and descriptions.
- Select the correct category.
- Upload product images or leave blank if you plan to add them later.
- Add one or more variants with SKU, price, sale price, cost price, stock status, barcode, and optional variant image.
- Set product options if the product varies by size, flavour, colour, or similar attributes.
- Configure flags such as POS-only, collection-only, age-restricted, active, and manage stock.
- Save the product and verify it appears in the correct channel.
Customers and Customer Requests
Use the customer module to manage registered users, loyalty balances, and customer records. Use the customer request workflow to track special orders or manual requests.
Manage customers
- Open Admin → Customers → Customer List.
- Search by name, email, or contact details.
- Open a customer record to review account information and order history.
- Edit details when contact information changes.
- Use customer communications tools where configured.
Manage customer requests
- Open Admin → Customers → Customer Requests.
- Create a request when a customer asks for a special item, reserved item, or manual follow-up.
- Record names, phone numbers, item details, and status notes.
- Update the request as stock arrives or the item is collected.
Web Orders and POS Sales
UltimatePOS separates online orders and POS sales into dedicated views so you can manage them appropriately while still reporting on both.
Web Orders
- Open Admin → Sales → Web Orders.
- Search or filter orders.
- Open an order to review items, payments, customer details, and status.
- Edit status, update order details, or process refunds where needed.
POS Sales
- Open Admin → Sales → POS Sales.
- Review till transactions and payment breakdowns.
- Use this area to investigate a completed in-store transaction or reconcile issues.
Gift Vouchers
Gift vouchers are managed as their own records and can be sold or redeemed through the platform.
- Open Admin → Inventory → Gift Vouchers.
- Create voucher entries or review existing voucher balances.
- Track issued value, current balance, active status, and related order references.
- Redeem vouchers through web or POS flows where supported.
Offers and Promotions
Offers can target categories or products and are automatically applied in checkout and POS when the rules match.
- Open Admin → Inventory → Offers.
- Create the promotion and choose the offer type.
- Select target products or categories.
- Set buy/get quantities, promotional prices, percentages, or other matching rules.
- Set start and end dates if the promotion is time-limited.
- Save the offer and run a test purchase to confirm it applies as expected.
Media Gallery
The media module is the central image library for products, content pages, and brand assets.
- Open Admin → Inventory → Media Gallery.
- Upload images into the library.
- Use the picker in product or content editors to reuse uploaded assets.
- Keep image naming consistent so media remains easy to find later.
Suppliers and Supplier Orders
Supplier workflows let you keep vendor records, import supplier catalogs, link supplier items to your own stock, and create supplier purchase orders.
Create supplier records
- Open Admin → Suppliers → Supplier List.
- Create a supplier with contact name, email, phone, website, and address details.
- Add ordering notes if the supplier has account-specific instructions.
- Save the supplier and confirm it appears in the supplier list.
Import supplier catalog data
- Open the supplier detail area and locate the catalog or import tools.
- Upload the supplier CSV file.
- Review imported items and confirm the data looks correct.
- Link supplier catalog lines to existing product variants using supplier SKU or direct mapping.
- If required, create new products from supplier lines where no internal product exists yet.
Create supplier orders
- Open Admin → Suppliers → Supplier Orders.
- Create a new order and select the supplier.
- Add lines for the required products or supplier catalog items.
- Save the order and send it through your normal supplier communication channel.
- When stock arrives, receive the order and confirm inventory updates have been applied.
Reports
Reporting covers sales, payment methods, cash reconciliation, transaction counts, hourly breakdowns, and product performance.
Operational reports
- POS daily summaries.
- Cash reconciliation.
- Payment method breakdowns.
- Cash adjustments and expected vs actual till cash.
Sales analysis
- Total sales and transaction counts.
- Top-selling products.
- Hourly sales performance.
- Combined visibility across web and POS activity.
Storefront Content, Brands, and Blog
Use the content modules to control how the public website looks and reads without changing code.
Storefront configuration
- Open Admin → Content → Storefront.
- Update hero text, hero image, and text alignment.
- Select spotlight content such as featured categories or a product of the month.
- Adjust header and footer presentation if those options are enabled in the page.
- Save and review the public homepage.
Brands and blog
- Open Admin → Content → Brands to manage brand visuals and public brand presentation.
- Open Admin → Content → Blog Posts to create or edit articles.
- Use Blog Categories to keep posts organised.
- Review the public blog pages after publishing content changes.
SEO and Sitemap
The SEO module helps control how the site is described to search engines and how public content is indexed.
- Open Admin → Settings → Sitemap / SEO.
- Review titles, descriptions, and indexable content where available.
- Confirm products, categories, and blog content use appropriate metadata.
- Verify the generated sitemap after major content changes.
Delivery Configuration
Delivery options define how customers can receive orders and what they are charged.
- Open Admin → Settings → Delivery.
- Create each delivery option with a name, description, price, and active state.
- Set free shipping thresholds where appropriate.
- Make sure collection is enabled if you offer in-store collection.
- Test checkout with and without collection-only products.
Payment Configuration
Payment settings control which payment methods are visible and which credentials are used for each provider.
Viva Wallet and PayPal
- Open Admin → Settings → Payments.
- Enable Viva Wallet if card processing through Viva is required.
- Enter Viva Merchant ID and API Key.
- Enable PayPal if PayPal checkout should be offered.
- Enter PayPal Client ID, Client Secret, and choose the environment.
- Save and run a test checkout before switching to live credentials.
Viva POS terminal
- Enable Viva Wallet POS Integration if an in-store terminal is used.
- Enter the POS Client ID, Client Secret, and Terminal ID.
- Save the settings and test a POS card transaction.
General Settings
General Settings contain the core operational defaults for the system. These settings affect public storefront behaviour, POS behaviour, and background integrations.
Store Info
- Store name.
- Contact phone and email.
- VAT number and company registration number.
- Company address.
Business Rules
- Order prefix.
- Tax rate.
Loyalty System
- Points earned per £1 spent.
- Points required to redeem £1.
Integrations
- WhatsApp API token.
- WhatsApp phone number ID.
POS Float
- Default starting till float.
- Used for start-of-day and end-of-day reconciliation.
Operational Controls
- Camera age verification toggle.
- Thermal printer support toggle.
- Cache clearing and forced reload.
Recommended setup order for General Settings
- Complete Store Info first so legal and contact details are correct.
- Set the tax rate and order prefix under Business Rules.
- Configure Loyalty only if you intend to use it immediately.
- Set the POS Float before training staff on tills.
- Enable Age Verification if you sell restricted products in POS.
- Enable Thermal Printer Support only after the printer environment has been tested.
POS Staff
Cashiers are separate operational users for the till. They allow accountability and shift reporting without needing every staff member to use the main admin login.
- Open Admin → Settings → POS Staff.
- Create a cashier name and secure code.
- Save the cashier record.
- At the POS, login using the cashier prompt before starting a session.
Quick Stock
Quick Stock is a fast operational tool for editing stock levels without opening the full product editor.
- Open Admin → Quick Stock.
- Search for the product or scan the barcode.
- Adjust the stock level or stock status.
- Save the change and confirm the product reflects the updated availability.
POS Overview
The POS is designed for touchscreen sales, barcode scanning, loyalty redemption, restricted-product age checks, parked sales, offline queueing, and end-of-day reconciliation.
Core functions
- Cashier login.
- Barcode search and manual browsing.
- Discounts and loyalty redemption.
- Cash, manual card, and configured terminal payments.
Operational protections
- Opening float declaration.
- Cash adjustments.
- Offline sales queue.
- End-of-day count and reconciliation.
POS Start of Day
Starting the till correctly is important because later cash reconciliation depends on the opening float and cashier session data.
- Open
/posand login as the cashier. - If the till is closed or has no active session, the float count modal opens.
- Count the cash drawer and enter the quantity of each denomination.
- Confirm the total against the expected float amount set in General Settings.
- Continue to open the POS session.
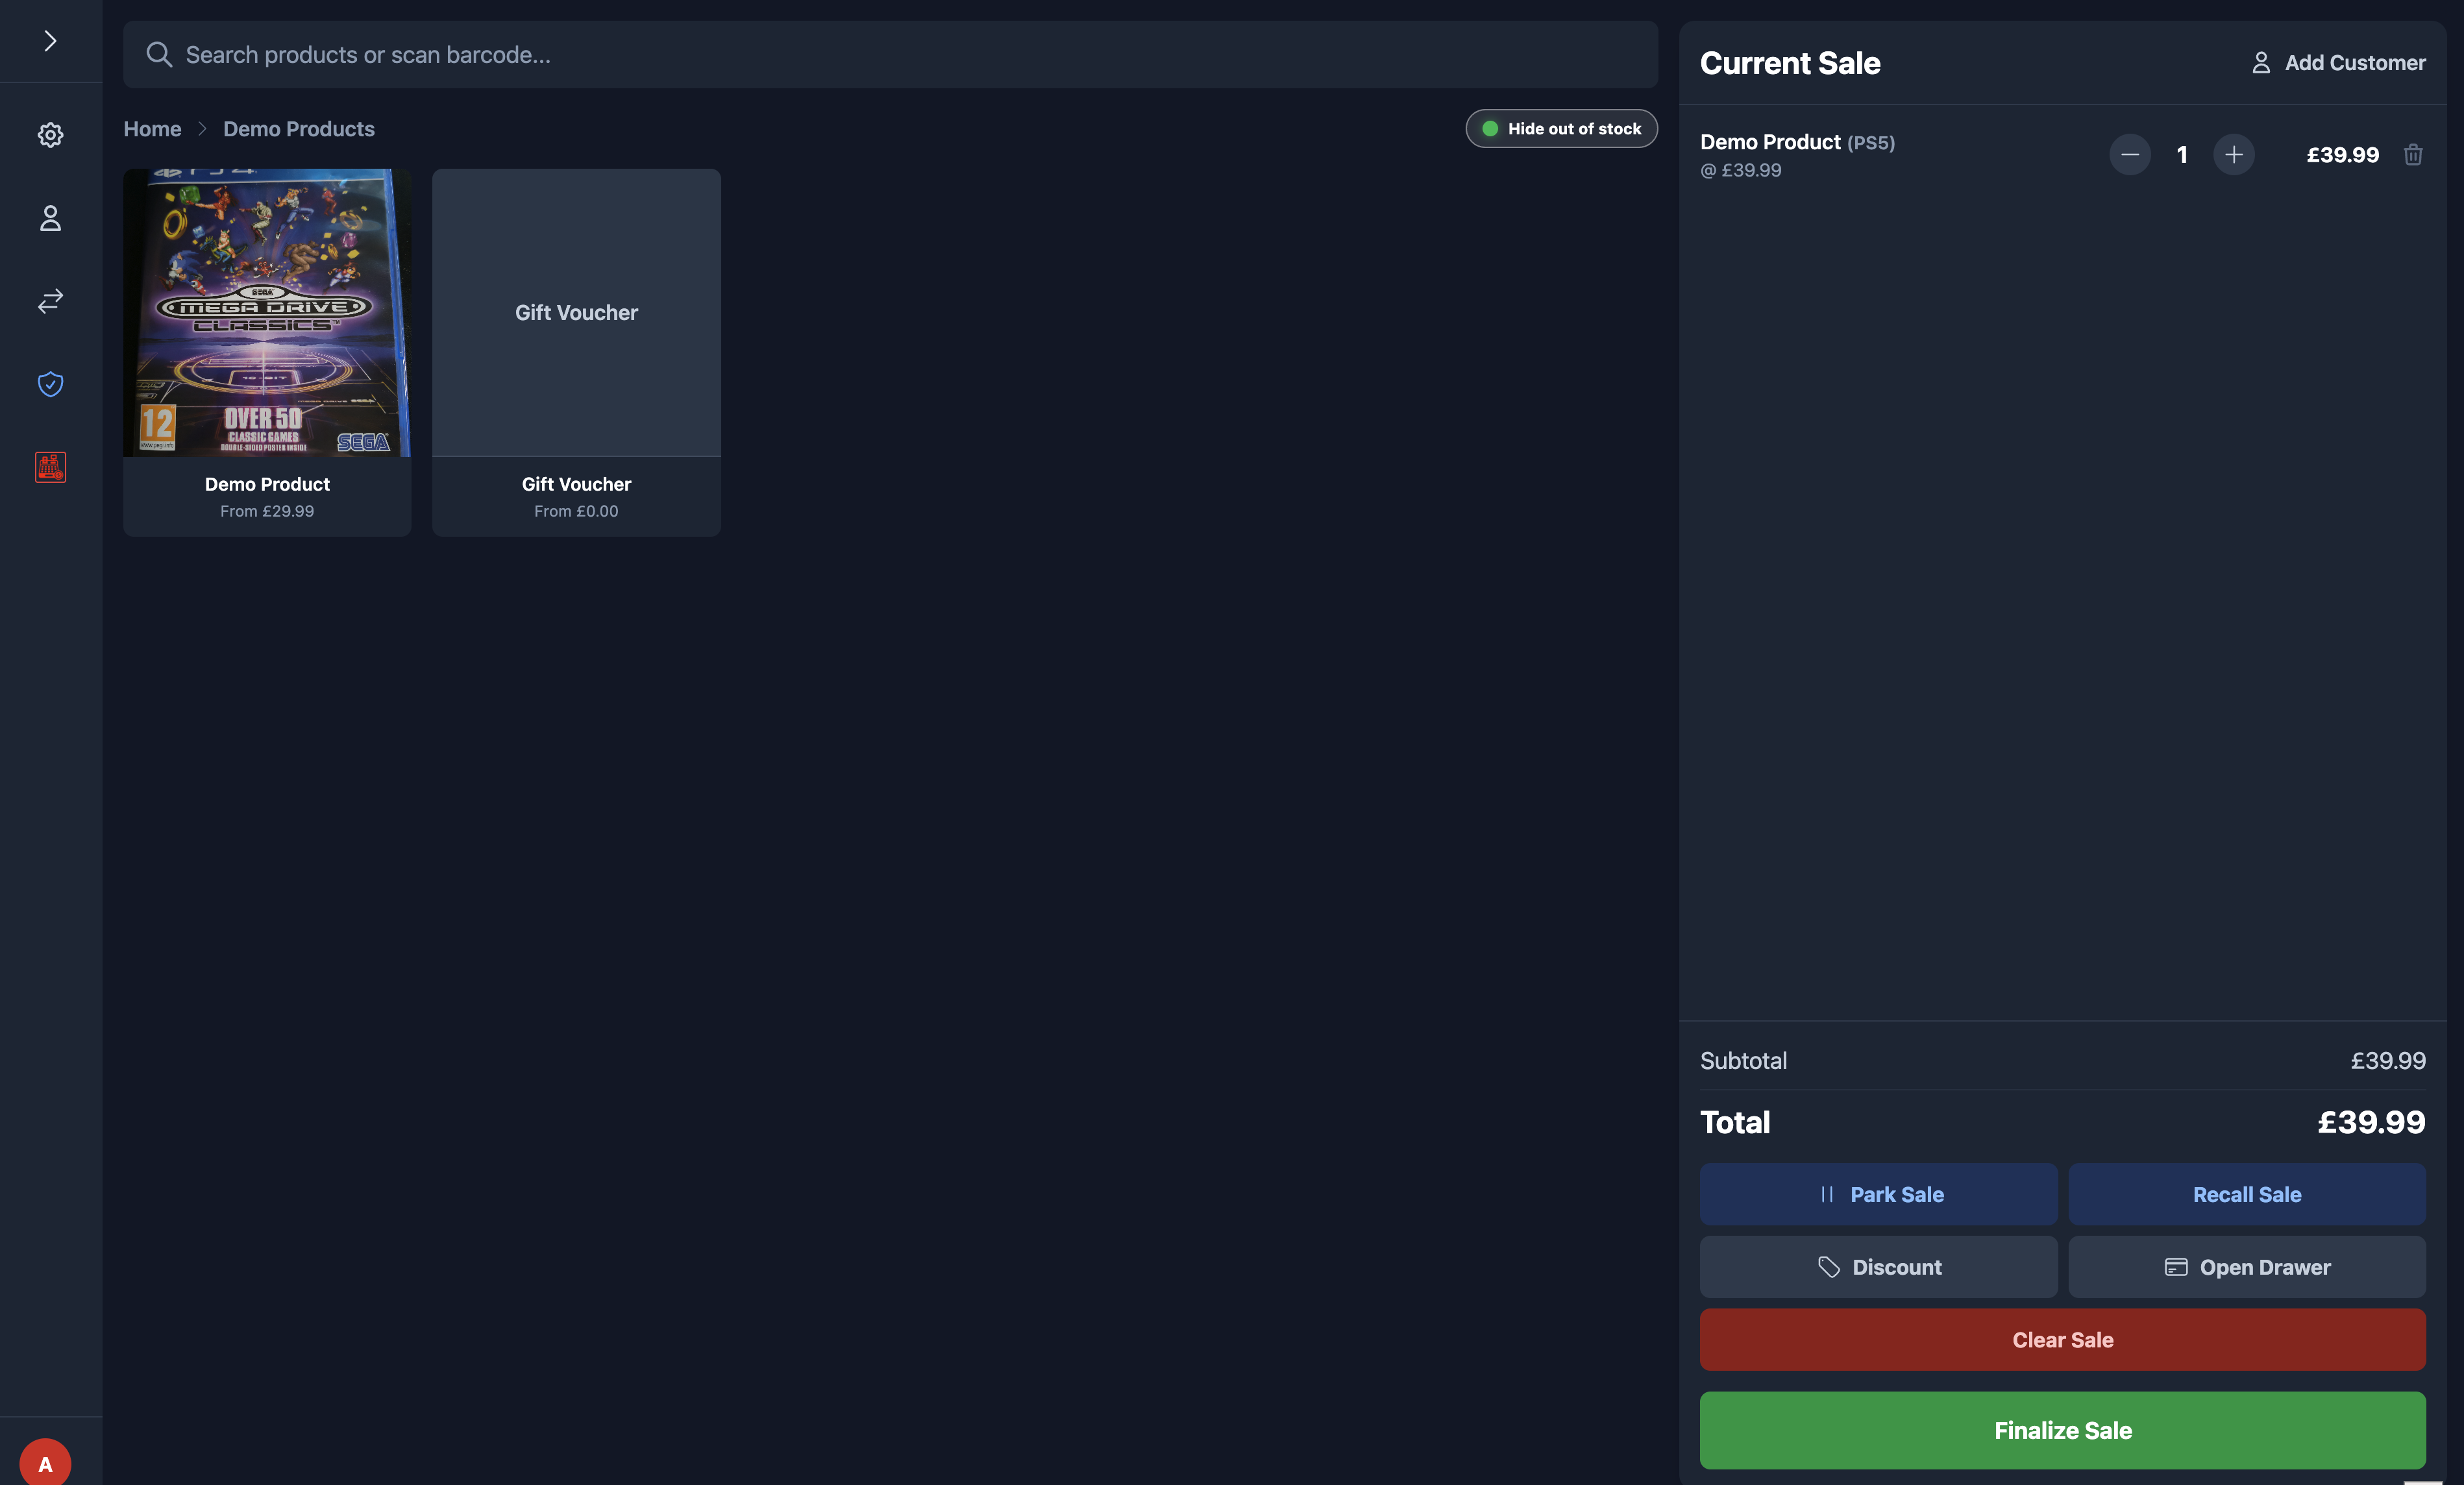
POS Selling Workflow
This is the standard selling procedure staff should follow for normal in-store transactions.
Sell an item
- Search for a product, scan a barcode, or browse categories.
- Tap the product tile to add it to the sale.
- If the product has multiple variants, select the required option.
- Adjust quantities using the sale controls.
- Add a customer if loyalty or customer history should be attached.
- Apply discounts if authorised.
- Tap finalise sale and choose the payment method.
- Print, email, or complete the receipt workflow as required.
Parked sales and offline queue
- Use the park sale feature if the customer steps away or wants to continue later.
- Name the parked sale clearly so it is easy to recall.
- If the internet connection drops, continue selling. Offline sales are queued locally.
- When the connection returns, the queue syncs automatically.
Restricted product sales
- If a sale contains age-restricted products and camera verification is enabled, the age verification workflow starts before payment.
- Complete or override the verification according to store policy.
- Only continue once the age-check result is acceptable.
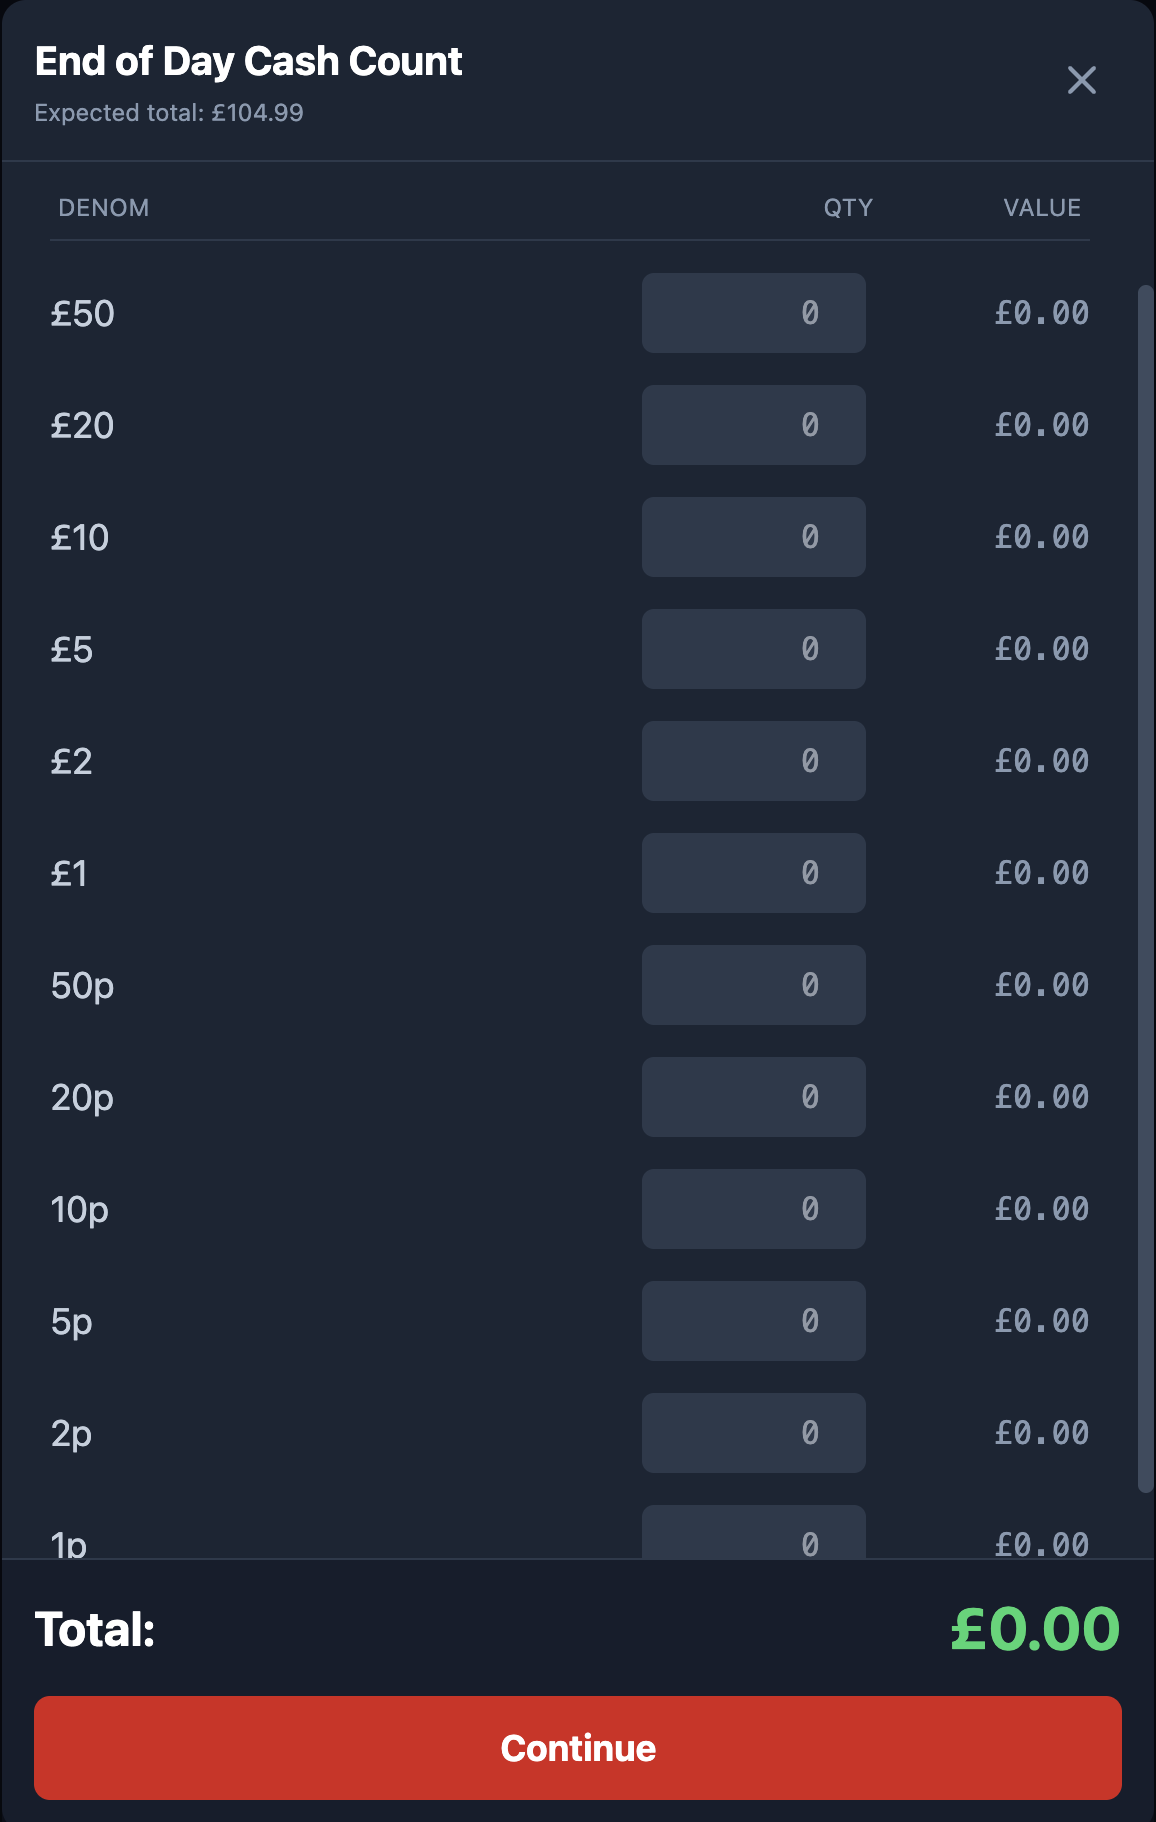
POS End of Day
End-of-day closes the active till session, compares the actual counted cash to the expected total, and produces a summary suitable for review and reporting.
- Open the End of Day option in the POS sidebar.
- Allow the system to calculate expected till cash from opening float, cash sales, and cash adjustments.
- Count the drawer and enter the quantity of each denomination.
- Review any mismatch warnings carefully before confirming.
- Complete the report and store or print the summary as required by your business process.
Customer Display
The customer display mirrors the current sale on a second screen so the customer can see items, pricing, and payment progress.
- Open
/customer-displayon the second display device. - Keep the display connected to the same browser environment or setup channel as the POS terminal.
- Start or update a sale in POS and confirm the mirrored display updates in real time.
Visual Guide
Visual examples for key workflows across administration, POS operations, and storefront conversion.
Admin Workspace Layout
POS Selling Screen
Start / End of Day Count
Storefront Product Journey
Staff Training Appendix
Use these scenario drills for induction and refresher training. They are designed to reduce common transaction mistakes and ensure consistent handling of exceptions.
Scenario 1: Refund Handling
- Locate the original order in Web Orders or POS Sales.
- Confirm the item, quantity, and payment method before taking action.
- Apply the refund in the correct channel, then verify order status and notes are updated.
- If cash is returned from the drawer, record the movement if store process requires a cash adjustment entry.
- Confirm customer communication is clear before closing the case.
Scenario 2: Gift Voucher Sale and Redemption
- Issue the voucher from the Gift Vouchers workflow or POS process, recording amount and voucher number.
- Confirm the voucher appears with an active balance.
- During redemption, apply the voucher to the correct sale and verify remaining balance calculations.
- If voucher balance reaches zero, confirm final status is updated correctly.
- Escalate immediately if voucher number conflicts or unexpected balances are shown.
Scenario 3: Supplier Order Receiving
- Open the supplier order and confirm which lines have physically arrived.
- Receive only the delivered quantities, not the full order by default.
- Verify stock movement against expected SKUs and linked variants.
- Check that due-in quantities and expected dates update as intended.
- Report and note shortages or substitutions immediately so ordering history remains accurate.
Maintenance and Routine Admin Tasks
Routine discipline keeps the platform reliable. The system is flexible, but reliability still depends on clean operational habits.
- Review new web orders and supplier orders daily.
- Check low-stock items and due-in items regularly.
- Keep payment credentials, contact details, and delivery settings current.
- Verify backups of the database and uploaded media are in place.
- Clear cache only when necessary after confirming a stale asset problem.
Local Media Smoke Test
Use the local smoke test after PHP upgrades, upload-path changes, or release hardening work so you can verify the media pipeline without hand-running curl commands.
What the script verifies
- Disposable admin creation and authenticated login.
- PNG upload through the media conversion endpoint.
- Media delete through the protected media API.
- Audit log entries for
media.uploadandmedia.delete. - Category create and delete through the protected categories API when you run the companion category smoke test.
- POS order creation, stock deduction, and
orders.create_posaudit logging when you run the companion POS orders smoke test. - Customer authentication, web order creation with server-side pricing calculation, and pending order state before payment confirmation when you run the companion web orders smoke test.
- Product CRUD with variant management and
products.create/products.update/products.deleteaudit logging when you run the companion products smoke test. - Supplier order creation, receipt processing, and stock replenishment when you run the companion suppliers smoke test.
- Admin-only settings updates with batch configuration handling and
settings.updateaudit logging when you run the companion settings smoke test.
How to run it
- Confirm local database credentials in
.envare correct. - Use a PHP runtime with GD WebP support. Homebrew PHP is the default test runtime.
- Run
npm run smoke:media:localfrom the project root. - Run
npm run smoke:categories:localwhen you want to verify protected category mutations and their audit trail. - Run
npm run smoke:orders:pos:localwhen you want to verify POS order creation, stock reduction, and order audit logging. - Run
npm run smoke:orders:web:localwhen you want to verify customer order creation, server-side pricing, and pending order status. - Run
npm run smoke:products:localwhen you want to verify product CRUD, variant handling, and mutation audit logging. - Run
npm run smoke:suppliers:localwhen you want to verify supplier order workflow and stock replenishment. - Run
npm run smoke:settings:localwhen you want to verify settings management and admin-only access control. - Review the printed HTTP status codes and database state summaries.
127.0.0.1 for that run so PHP uses TCP instead of a Unix socket path that may not exist.
Troubleshooting
Most operational issues are configuration, connectivity, or data consistency problems rather than application failures. Work through the checks below before escalating.
Setup loops back to /setup
- Confirm the root-level
.envfile exists and is readable. - Confirm the installer finished successfully.
- Confirm the required database tables were created.
Payment option missing
- Check whether the provider is enabled in Payments.
- Verify the relevant credentials are present.
- Check whether the current route is web checkout or POS, as provider settings differ.
POS cash mismatch
- Confirm the opening float was declared correctly.
- Confirm all cash adjustments were logged.
- Recount denominations by quantity rather than total money value per row.
Updated files do not appear
- Use General Settings → Cache to clear service worker and local caches.
- Confirm the deployed
dist/files are the new build, not an older copy.
Go-Live Checklist
Complete this checklist before directing real customers or store staff to the live system.
- Admin login works and first admin credentials are stored securely.
- General Settings are completed with correct contact and legal information.
- Payments are configured and tested using the intended live providers.
- Delivery methods and collection logic have been tested.
- At least one full web order has been placed successfully.
- At least one full POS sale has been completed successfully.
- Supplier records and stock workflows are ready if purchasing is managed in-system.
- The customer display works if a second screen is used.
- Staff have been trained on start-of-day, end-of-day, and refunds.
- Backups, SSL, and environment credentials are confirmed.